Mastering Bow Drawing: Artistic Flair & Archery Precision Explained
Have you ever been captivated by the elegant curve of a beautifully drawn bow, whether it's a decorative ribbon adorning a gift or the powerful arc of an archer's instrument? The art of bow drawing is a fascinating skill that spans both creative expression and technical understanding. From simple sketches to intricate designs, learning how to draw a bow can open up a world of artistic possibilities, enhancing your ability to depict everything from fashion accessories to historical weaponry.
This comprehensive guide will take you on a journey through the diverse world of bow drawing. We'll explore the fundamental techniques for sketching various artistic bows, from the cute and whimsical to the sophisticated and stylish. Beyond the visual arts, we'll also touch upon the distinct challenge of drawing an archery bow, acknowledging its unique structure and purpose. Whether you're a budding artist, a parent looking for fun drawing activities with children, or simply curious about the mechanics behind a powerful shot, you'll find valuable insights and actionable steps to elevate your bow drawing skills.
Table of Contents
- The Art of Bow Drawing: From Simple Sketches to Elegant Designs
- Essential Tools for Your Bow Drawing Journey
- Mastering the Basics: Step-by-Step Bow Drawing for Beginners
- Exploring Different Styles in Bow Drawing
- Enhancing Your Bow Drawings: Color, Texture, and Outline
- Beyond the Ribbon: Drawing an Archery Bow
- The Physical Act of Bow Drawing: Form and Technique
- Where to Find Inspiration and Practice Your Bow Drawing Skills
The Art of Bow Drawing: From Simple Sketches to Elegant Designs
The act of bow drawing, in its artistic sense, is a versatile skill that allows you to create charming accents for various purposes. Imagine adding a delicate ribbon bow to a sketched dress, a festive touch to a birthday card, or a whimsical element to a children's book illustration. Bows can convey a range of emotions and styles, from playful and cute to sophisticated and formal. This flexibility makes bow drawing an excellent exercise for artists of all levels, especially beginners and children, as it teaches fundamental concepts like symmetry, proportion, and flow. You can learn how to draw different styles of bows with easy steps and tips, adapting the basic structure to fit any creative vision. Whether you're aiming for a classic look or a playful touch, there are plenty of fun ideas to explore when it comes to artistic bow drawing.Essential Tools for Your Bow Drawing Journey
Before you embark on your bow drawing adventure, gathering the right materials is crucial. Thankfully, you don't need an extensive art studio to get started. The beauty of bow drawing lies in its accessibility. You will need a piece of paper, a pencil, an eraser, and some coloring materials to create your own cute bow. * **Paper:** Any standard drawing paper will do. Smooth paper works well for fine lines, while slightly textured paper can add character. * **Pencil:** A standard HB pencil is perfect for sketching. You might also want a harder pencil (like 2H) for light guidelines and a softer one (like 2B or 4B) for darker lines and shading. * **Eraser:** A good quality kneaded eraser or a vinyl eraser is essential for correcting mistakes and lifting excess graphite without damaging the paper. * **Coloring Materials:** Crayons, colored pencils, markers, or watercolors can bring your bow drawings to life. Experiment with different mediums to see what effects you prefer. Having these simple tools at hand will ensure a smooth and enjoyable drawing experience as you begin to master the art of bow drawing.Mastering the Basics: Step-by-Step Bow Drawing for Beginners
Learning how to draw a bow can be broken down into a few simple, manageable steps. This tutorial is designed for beginners and children who want to draw a bow for clothing, decoration, or gifts. We'll start with the foundational elements and gradually build up to a complete, polished drawing. Follow the easy instructions and see the examples of each stage of the drawing process.Starting with the Centerpiece: The Knot
Every great bow drawing begins with its focal point: the knot. This central element ties all parts together and dictates the overall symmetry of your bow. 1. **Mark off the width and height of the picture:** Before you even start drawing, it's a good practice to lightly mark the general area your bow will occupy on the paper. This helps with composition. 2. **Draw a guideline for the bow:** A light horizontal or vertical line can help ensure your bow is straight. 3. **Begin with the main element of your bow — its center:** This is the core from which everything else will sprout. 4. **Draw a rectangle in the middle of your paper, making sure it’s straight and symmetrical:** This rectangle will serve as the knot of the bow. It doesn't have to be perfect, but aim for a clean shape. This initial step is crucial for establishing the foundation of your bow drawing.Crafting the Loops: The Heart of Your Bow
Once your knot is in place, it's time to give your bow its iconic shape: the loops. These are the most recognizable features of any bow. 1. **Start drawing the middle of the bow:** From the sides of your central rectangle, you'll extend lines outwards. 2. **To complete this step, you have to draw two similar short curved lines opposite each other:** These lines will form the inner edges of your loops, curving gently away from the knot. Think of them as the initial outline for the "puffy" part of the bow. 3. **Complete the drawing of the middle of the bow:** Now, you'll connect these initial curves. 4. **Connect the ends of the previously drawn lines with curved lines, and add lines in the middle:** These new curved lines will form the outer edges of your loops, giving them volume. Adding lines in the middle of each loop can suggest folds and depth, making your bow drawing appear more three-dimensional.Adding the Tails: Flow and Movement
The tails of a bow add a sense of movement and elegance, completing its form. They can be short and neat or long and flowing. 1. **Draw the bottom outline of the bow loops:** Extend lines downwards from the bottom of your central knot or from beneath the loops. 2. **Shape the tails:** You can make them straight, cut them into a 'V' shape, or even add gentle curves to suggest they are fluttering in the wind. The length and style of the tails can significantly change the overall look of your bow drawing. For example, short, crisp tails might suit a formal bow, while long, wavy tails could be perfect for a playful design.Refining Your Bow Drawing: Details and Dimension
With the basic structure in place, it's time to bring your bow drawing to life with details, color, and outlines. This is where your bow truly starts to shine. 1. **Add folds and creases:** Observe real bows. Fabric folds and creases naturally. Lightly sketch lines within the loops and tails to mimic these folds, adding depth and realism. 2. **Outline your drawing:** Once you're happy with your pencil sketch, go over your lines with a darker pencil, pen, or marker to create a clean, defined outline. This step makes your bow drawing pop. 3. **Add color:** This is where you can truly personalize your bow. Choose colors that match your intended use – vibrant for a festive bow, pastel for a cute baby accessory, or classic red for a gift. Experiment with shading by applying darker tones in areas where light wouldn't hit, like under folds or inside the knot. You can see examples of simple and fancy bows, and how to add color and outline to your drawings, to get inspiration.Exploring Different Styles in Bow Drawing
The beauty of bow drawing lies in its incredible versatility. Once you've mastered the basic steps, you can easily adapt them to create a myriad of styles. Looking for bow drawing ideas for beginners? This blog features simple and creative ways to draw bows, from cute ribbon bows to decorative and stylish designs. * **Simple Ribbon Bows:** These are often flat and two-dimensional, perfect for quick sketches or digital illustrations. Focus on clean lines and clear shapes. * **Fancy and Decorative Bows:** These involve more intricate folds, multiple layers of ribbon, and often more elaborate tails. You might add ruffles, pleats, or even small embellishments like beads or pearls. * **Cute Bows:** Often characterized by softer, rounder shapes, exaggerated loops, and vibrant colors. These are ideal for children's illustrations, stickers, or fashion designs. * **Realistic Bows:** For a more lifelike appearance, pay close attention to how light interacts with fabric, creating shadows and highlights. This involves more advanced shading techniques. Whether you want a classic look or a playful touch, there are plenty of fun ideas to explore. Don't be afraid to experiment with different proportions for the knot, loops, and tails to create unique bow designs. Find and save ideas about bow drawing on Pinterest for endless inspiration.Enhancing Your Bow Drawings: Color, Texture, and Outline
To truly elevate your bow drawing, consider how color, texture, and a strong outline can transform a simple sketch into a vibrant piece of art. * **Color Application:** Beyond just filling in shapes, think about how color can convey depth. Use lighter shades for areas facing the light and darker shades for shadows. Blending colors can create smooth transitions and a more professional look. * **Adding Texture:** While a ribbon bow drawing might imply a smooth, silky texture, you can add subtle lines or cross-hatching to suggest different materials like rough burlap, delicate lace, or crisp satin. For example, if you're drawing a wooden archery bow, you could add some more wood texture on the bow to highlight this part of the bow’s makeup, using lines to mimic wood grain. * **Outlining for Definition:** A well-defined outline can make your bow drawing stand out. You can use a slightly darker pencil, an ink pen, or a fine-tip marker. Varying the line thickness—thicker lines for the outer edges and thinner lines for internal details—can add dynamism and a sense of professionalism to your drawing. This step is particularly effective in making your simple bow sketch appear polished and complete.Beyond the Ribbon: Drawing an Archery Bow
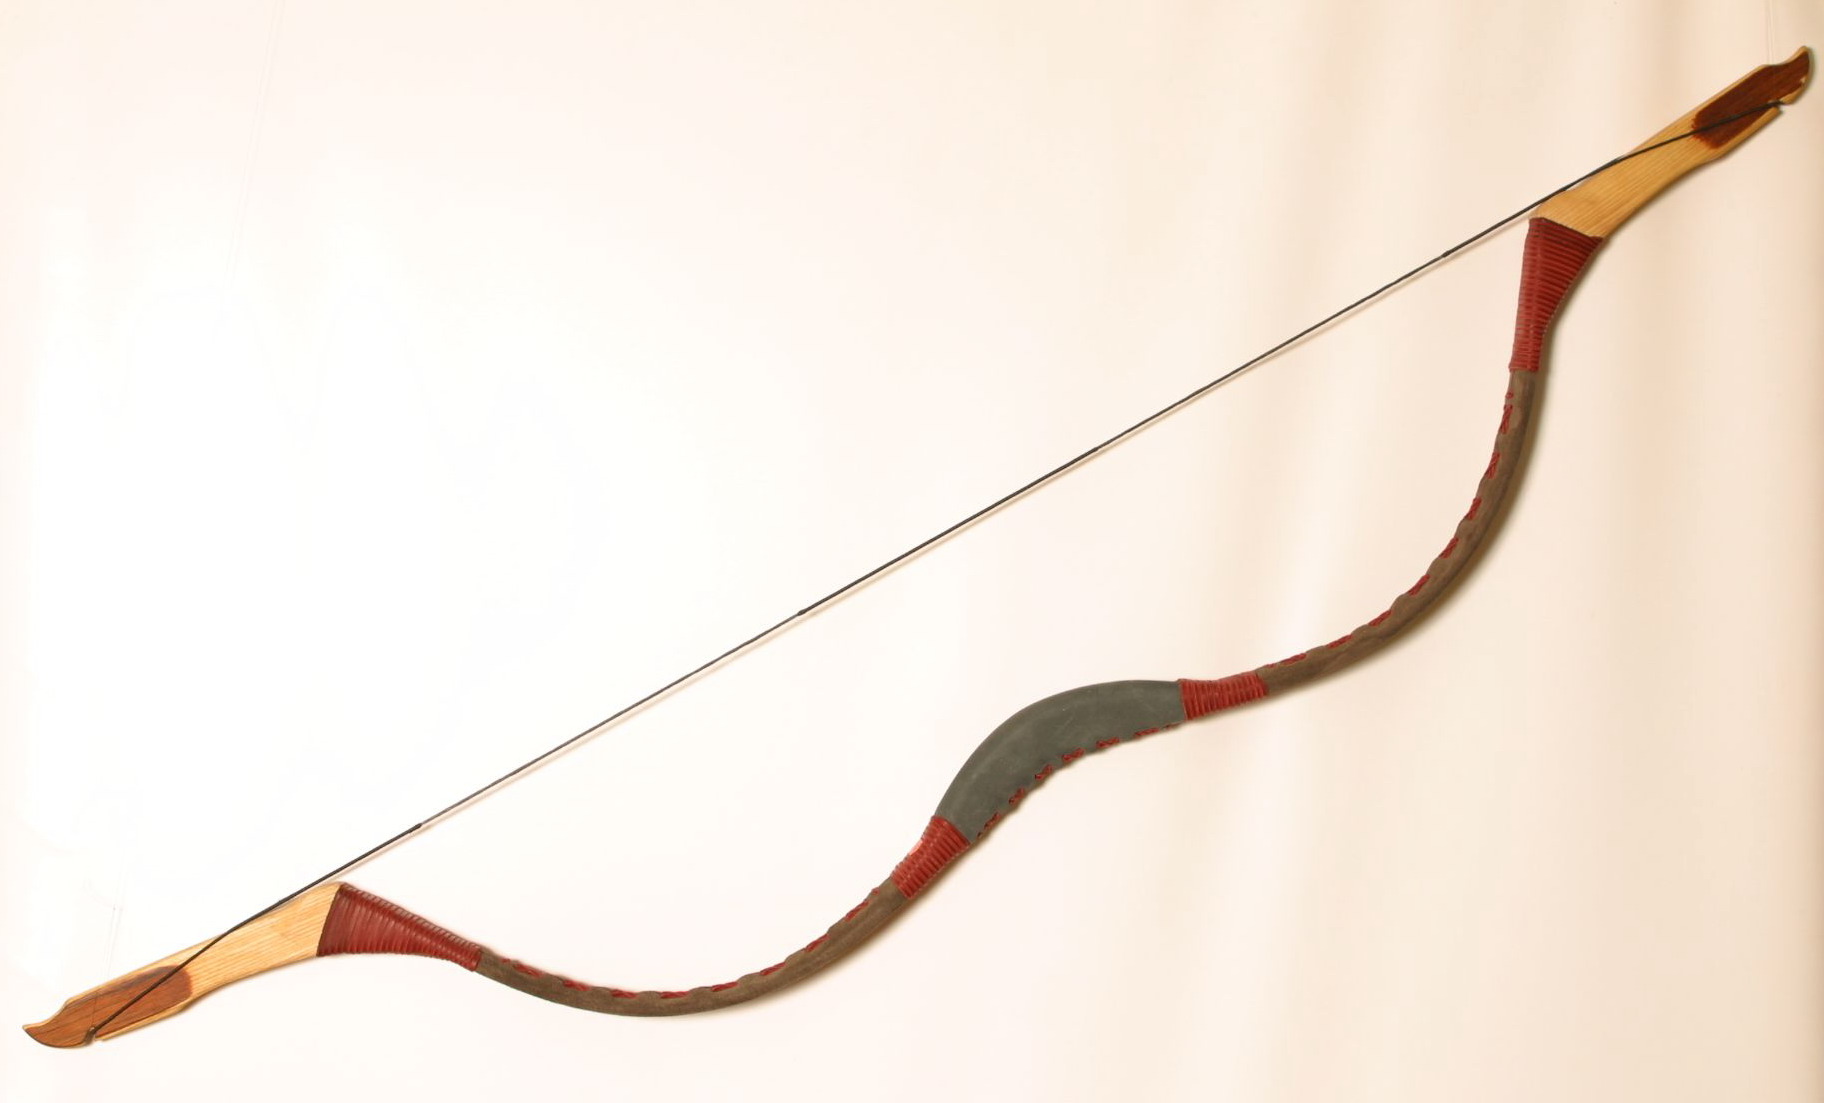
While much of our focus has been on decorative bows, the term "bow drawing" also refers to the depiction of an archery bow. Drawing a bow and arrow requires a different set of skills compared to drawing a ribbon bow or a hair bow, as it emphasizes structure, tension, and a sense of power. * **Basic Shape:** Start by sketching the basic shape of the bow, which consists of two curved lines connected by a straight line in the middle. This forms the main limbs and riser of the bow. * **Structural Details:** An archery bow is a tool designed for function. This drawing of a bow shows a simple wooden bow that would be used for archery. You might add details like the string, the arrow rest, and the grip. * **Variations:** Bows can come in many shapes and forms. For example, you could change the structure of it a bit to depict different types like longbows, recurve bows, or compound bows. The bow tapers in thickness from 1/8 to 1/16 over its length, so when bent it forms a curve of continually changing radius. This subtle tapering is key to its functionality and can be implied in your drawing to show its dynamic nature. It works like a ship's curve, where the flex distributes stress evenly. Adding wood texture or other material details can enhance realism. Understanding the purpose and mechanics of an archery bow will greatly aid your artistic representation of it, allowing you to convey its strength and precision.The Physical Act of Bow Drawing: Form and Technique
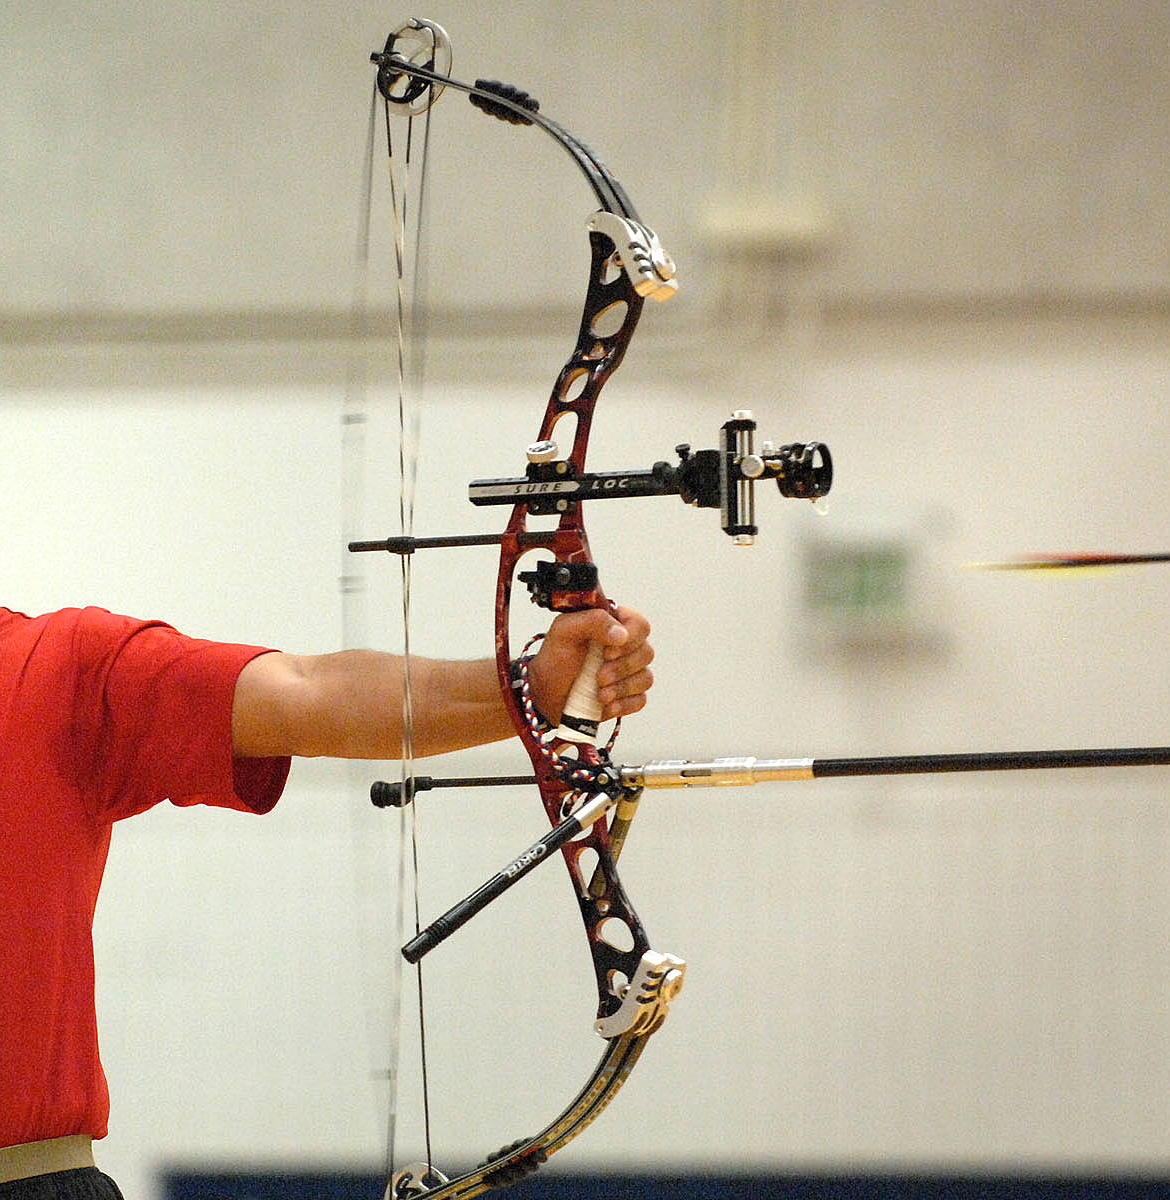
While this article primarily focuses on artistic bow drawing, it's worth acknowledging the other significant meaning of "bow drawing" – the physical act performed by an archer. This is where human skill, strength, and precision come into play, transforming a static object into a dynamic force. For archers, "drawing a bow" refers to pulling back the bowstring to full draw, preparing to release an arrow. * **Core Mechanics:** Learn the basics of drawing a bow with your back muscles, aligning your shoulders, and checking your form. This is paramount for consistency and preventing injury. Archery coaches emphasize using the large muscles of the back, rather than just arm strength, to execute a smooth and powerful draw. * **Form and Alignment:** Proper form involves a stable stance, consistent grip, and a straight draw line from the bow to the anchor point. Aligning your shoulders correctly ensures efficient energy transfer and reduces strain. * **Efficiency and Accuracy:** Find out how to avoid common issues and improve your draw efficiency and accuracy. Common issues include "collapsing" at the shot, plucking the string, or inconsistent anchor points. Drills focusing on muscle memory and controlled release are vital. In this video, we show you how you can start your first real bow drawing experience, highlighting the importance of correct technique from the very beginning. While distinct from artistic drawing, understanding this physical process can even inspire more dynamic and accurate depictions of archers in action.Where to Find Inspiration and Practice Your Bow Drawing Skills
The journey of mastering bow drawing is continuous, and inspiration is everywhere. Don't limit yourself to just one type of bow; explore the vast array of designs and applications. * **Pinterest:** This platform is a goldmine for visual ideas. Find and save ideas about bow drawing on Pinterest, from step-by-step tutorials to finished artworks. Search for "bow drawing step by step," "cute bow drawing tutorial," or "realistic bow drawing" to discover a wealth of examples. * **Online Tutorials:** Many artists share their processes. Look for "how to draw a bow easy," "simple bow sketch," or "ribbon bow drawing tutorial" on YouTube or art blogs. * **Real-Life Observation:** Pay attention to bows you see in everyday life – on gifts, clothing, hair accessories, or even historical artifacts in museums. Observe their folds, textures, and how light interacts with them. * **Practice, Practice, Practice:** Like any skill, drawing improves with consistent effort. Don't be discouraged by initial attempts. Each drawing is a learning experience. You can even vectorize your simple bow drawing to make laser cut earrings or a 3D paper bow, transforming your sketches into tangible creations.The world of bow drawing, in all its forms, offers a rich landscape for creativity and learning. From the delicate loops of a decorative ribbon to the powerful curve of an archery bow, each type presents its own unique artistic challenge and reward. We've explored the essential tools, broken down the step-by-step process for artistic bows, delved into various styles, and even touched upon the distinct skill of drawing an archery bow and the physical act of drawing a bow in archery.
- Christin Black
- Mothers Warmth Chapter 3 Jackerma
- Peter Ellis Kings Guard
- Nna Netrebko Net Worth
- Sophie Rain Onlyfans Leak Exploring The Facts Myths And Controversies
Remember, the key to mastery lies in consistent practice and a willingness to experiment. Don't be afraid to try new techniques, explore different colors, and let your imagination guide your pencil. Whether you're aiming to sketch a charming accessory for a character or simply enjoy the meditative process of creating, your bow drawing journey is just beginning. What kind of bow will you draw next? Share your thoughts and creations in the comments below, or explore our other art tutorials to continue expanding your artistic horizons!
- Nautica Malone
- Mothers Warmth Chapter 3 Jackerma
- Fashion Nova Customer Service Number
- Sophie Rain Only Fans Leak
- Can An Animal Get A Human Pregnant
Bow Types – Hampstead Bowmen
Different Types Of Bow Shapes at Doris Mayer blog

Fiber glass laminated bows | Sarmat Archery
