Mastering Juicy Pan-Seared Chicken Breast: Your Foolproof Guide
Tired of dry, rubbery chicken breasts that taste more like cardboard than a satisfying meal? You're not alone. For many home cooks, learning how to cook chicken breast in a pan to perfection feels like an elusive culinary quest. But what if we told you that achieving tender, juicy, and flavorful boneless chicken breast in a pan is not only possible but also incredibly easy? It's a game-changer for quick dinners and meal prep, transforming a notoriously tricky protein into a weeknight hero.
This comprehensive guide is designed to demystify the process, offering you an easy, foolproof method to cook chicken breast that's golden on the outside and wonderfully moist within. We'll cover everything from choosing the right cut to mastering the heat, ensuring your chicken is never dry again. Get ready to impress yourself and your family with consistently delicious results, perfect for any meal.
Table of Contents
- Why Pan-Seared Chicken Breast is a Weeknight Winner
- Essential Prep for Perfect Pan-Seared Chicken
- Setting Up Your Skillet for Success
- The Step-by-Step Guide to Pan-Searing Chicken Breast
- Achieving That Perfect Juicy Result Every Time
- Troubleshooting Common Pan-Seared Chicken Problems
- Flavor Variations and Serving Suggestions
- Frequently Asked Questions About Pan-Seared Chicken Breast
- Conclusion: Mastering Your Chicken Breast Journey
Why Pan-Seared Chicken Breast is a Weeknight Winner
Pan-searing chicken breast is more than just a cooking method; it's a culinary superpower for busy individuals and families. The allure lies in its incredible speed and versatility. Imagine a delicious, protein-packed meal on the table in just 20 minutes – that's the magic of a properly pan-seared chicken breast. This method is perfect for quick dinners and meal prep because it delivers consistently juicy, golden, and never dry results. Unlike baking or grilling, which can sometimes require more active time or preheating, pan-searing is direct and efficient, making it ideal for those hectic weeknights when time is of the essence.
- Lyde Allen Green
- Is Cal Raleigh Married Unveiling The Mariners Stars Life
- 4 Girls One Fingerprint Unraveling The Mystery Behind The Viral Trend
- King Von Autopsy
- Paige Vanzant Leaked Nudes
Beyond its speed, the beauty of pan-searing is the exquisite texture it creates. A hot pan with a bit of oil or butter forms a beautiful, crispy exterior, while the interior remains succulent. This contrast in textures elevates the humble chicken breast from bland to brilliant. Whether you're a seasoned chef or just starting your cooking journey, mastering how to cook chicken breast in a pan will undoubtedly become a staple in your kitchen repertoire, offering endless possibilities for delicious and healthy meals.
Essential Prep for Perfect Pan-Seared Chicken
The secret to perfectly cooked chicken breast often lies not just in the cooking itself, but in the crucial steps taken before the chicken even touches the pan. These preparatory measures ensure even cooking, maximum flavor absorption, and that coveted juicy texture. Neglecting these steps is one of the biggest mistakes people make when trying to cook chicken breast in a pan.
Choosing the Right Chicken
For this method, always opt for boneless, skinless chicken breasts. While you can adapt this technique for chicken thighs, the focus here is on the lean, quick-cooking breast. When selecting your chicken, try to pick breasts that are roughly the same size and thickness. This uniformity is vital for ensuring they all cook at the same rate, preventing some pieces from drying out while others are still undercooked.
- Kaitlan Collins Husband A Closer Look At Their Relationship
- Sophie Raiin Spider Man
- Martin Sheen
- Noa Netanyahu Roth
- Necati Arabac%C3%84
The Art of Pounding and Thinning
This is arguably the most critical step for achieving consistently juicy results. Thick chicken breast won't cook through over high heat before the exterior noticeably dries out. Instead, a chicken breast needs to be sliced in half horizontally, or even in three pieces, if it's particularly large and thick. The goal is to create thinner, more uniform pieces.
Once sliced, or if your breasts are already somewhat thin but uneven, use a meat mallet or the bottom of a heavy pan to pound your chicken breasts to an even thickness, ideally around ¾ inch or less. Place the chicken between two sheets of plastic wrap before pounding to prevent a mess. This process ensures that every part of the chicken cooks simultaneously, leading to that perfectly tender and juicy result. The flatter the chicken, the better and faster it will cook, allowing you to easily dredge them in any flour mixture if your recipe calls for it, or simply ensure even searing.
Drying and Seasoning for Success
Moisture is the enemy of a crispy crust. Before applying any seasoning, be sure to pat your chicken breasts thoroughly dry with paper towels. Drying your chicken helps ensure the crispiest crust forms when it hits the hot pan. Any excess moisture will steam the chicken rather than sear it, preventing that beautiful golden-brown exterior.
Once dry, it's time to season! This is where you can truly infuse flavor into your chicken. A simple combination of salt and freshly ground black pepper is a great start. From there, you can add garlic powder, onion powder, paprika, dried herbs like thyme or oregano, or even a pre-made poultry seasoning blend. For deeper flavor, consider a light marinade. After seasoning, let the chicken rest for at least 15 minutes at room temperature to absorb the flavors. This resting period also contributes to the "room temperature is key" principle we'll discuss next.
Room Temperature is Key
One of the biggest mistakes people make when cooking chicken breast is taking it straight from the fridge to the pan. Cold chicken hitting a hot pan causes the muscle fibers to seize up, leading to tough, unevenly cooked meat. Instead, after seasoning, let the chicken come to room temperature for at least 15-30 minutes before cooking. This allows the chicken to cook more evenly from edge to center, ensuring a more tender and juicy outcome.
It's also important to note: do not try to cook still frozen chicken. It is highly recommended to thaw frozen chicken breast completely before cooking it on a skillet. This ensures even cooking and allows for better seasoning absorption, preventing a tough, rubbery texture and potential food safety issues.
Setting Up Your Skillet for Success
The right equipment and proper heat management are foundational to achieving that perfect pan-seared chicken breast. Just as important as the chicken preparation, the setup of your cooking environment plays a pivotal role in the final texture and flavor.
First, let's talk about the pan. For cooking chicken in a pan, a heavy-bottomed skillet is your best friend. A stainless steel pan or a cast iron skillet are excellent choices. These materials retain heat exceptionally well and distribute it evenly, which is crucial for creating a consistent, golden crust and ensuring the chicken cooks through without burning. Avoid thin, lightweight pans, as they tend to develop hot spots and cool down quickly when food is added, leading to uneven cooking.
Next, consider your cooking fat. Olive oil is a popular choice due to its high smoke point and neutral flavor, making it ideal for searing. Butter can also be used, either on its own for a rich, nutty flavor, or combined with olive oil to prevent the butter from burning too quickly. A good rule of thumb is to use just enough oil to lightly coat the bottom of the pan – typically 1-2 tablespoons, depending on the size of your skillet and the amount of chicken you're cooking. You want enough fat to facilitate searing, but not so much that the chicken deep-fries.
Finally, and perhaps most importantly, is the heat. The secret to a beautiful sear and quick cooking is high heat. Place your chosen skillet on the stove over medium-high to high heat. Allow the pan to heat up for several minutes until it's hot enough. You'll know it's ready when you see a slight shimmer from the oil, or if you drop a tiny bit of water into the pan, it immediately sizzles and evaporates. This initial high heat is what creates that desirable crispy exterior, locking in the juices. Without adequate heat, your chicken will steam rather than sear, resulting in a pale, less flavorful crust.
The Step-by-Step Guide to Pan-Searing Chicken Breast
With your chicken prepped and your skillet hot, you're ready to embark on the actual cooking process. This easy, foolproof method will guide you to a juicy, golden, and never dry result, perfect for weeknight dinners or meal prep. Follow these steps precisely to cook chicken breast in a pan like a pro:
- Add Fat to the Hot Pan: Once your skillet is hot, add your chosen cooking fat (olive oil, butter, or a combination). Swirl it around to coat the bottom of the pan evenly. Allow the oil to heat up for another 30-60 seconds until it shimmers slightly.
- Carefully Place Chicken in the Pan: Gently place the seasoned, room-temperature chicken breasts into the hot pan. Do not overcrowd the pan. If you're cooking more than two breasts, it's better to cook them in batches. Overcrowding lowers the pan's temperature and steams the chicken instead of searing it, preventing that crispy crust.
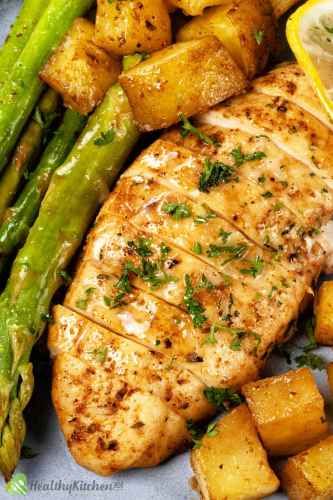
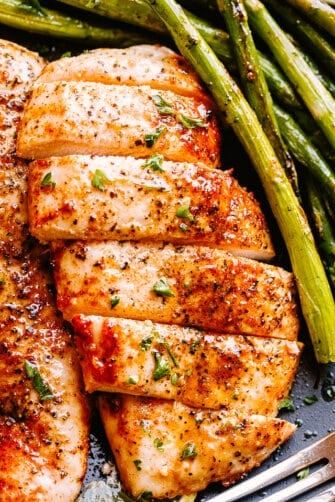
- Sear Without Moving: Let the chicken sear undisturbed for 5-7 minutes. The exact cooking time will depend on the thickness of your chicken. During this time, resist the urge to move or flip the chicken. This undisturbed contact with the hot pan is what creates that beautiful golden-brown crust. Leaving it uncovered will help create a crispy crust.
- Flip and Continue Cooking: Once the first side is deeply golden brown and releases easily from the pan, flip the chicken breasts. Continue to cook on the second side for another 3-5 minutes, or until the internal temperature reaches 165°F (74°C) using a meat thermometer. Thinner chicken will cook faster, so keep a close eye on the cooking time. For very thin breasts (around ½ inch thick), the entire cooking process might be as quick as 6-8 minutes total.
- Remove from Pan and Rest: Once cooked through, immediately remove the chicken breasts from the pan and transfer them to a clean cutting board or plate.
This method for making pan-seared chicken breast always results in juicy and flavorful chicken, and it comes together in just 20 minutes from start to finish, including prep time. The secret truly is high heat and properly thinned breasts.
Achieving That Perfect Juicy Result Every Time
While the previous steps lay the foundation for a perfectly cooked chicken breast, there are a few additional nuances that elevate your dish from good to truly exceptional. These are the final touches that guarantee that every bite is tender, flavorful, and incredibly juicy.
Don't Overcrowd the Pan: We touched on this earlier, but it bears repeating. When you add too many chicken breasts to the pan at once, the temperature of the pan drops significantly. This prevents searing and instead causes the chicken to steam in its own juices. The result? A pale, rubbery chicken breast with no crispy exterior. Cook in batches if necessary, ensuring there's enough space around each piece for proper heat circulation and direct contact with the hot surface.
Monitoring Internal Temperature is Your Best Friend: Guessing if chicken is cooked through is a recipe for either dry, overcooked meat or unsafe, undercooked meat. The most reliable way to ensure your chicken is perfectly cooked and safe to eat is by using an instant-read meat thermometer. Insert the thermometer into the thickest part of the chicken breast, making sure not to touch the bone (if applicable). Chicken breast is safely cooked when it reaches an internal temperature of 165°F (74°C). Pull it off the heat as soon as it hits this mark; it will continue to cook slightly as it rests.
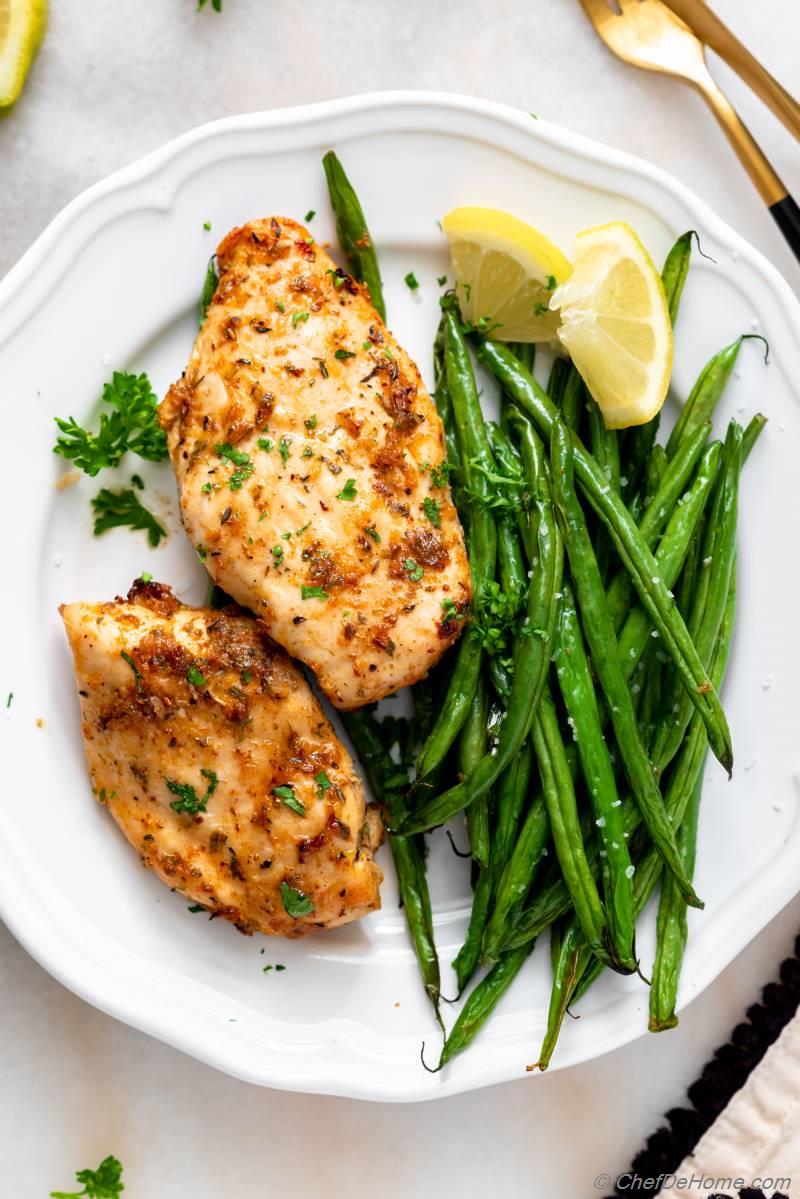
The Crucial Resting Period: This step is non-negotiable for juicy chicken. Once the chicken is cooked, resist the urge to slice into it immediately. Instead, transfer the chicken breasts to a cutting board and let them rest, uncovered, for at least 5-10 minutes. During cooking, the muscle fibers contract, pushing the juices to the center of the meat. Resting allows these juices to redistribute throughout the entire breast. If you cut into it too soon, all those precious juices will simply run out onto your cutting board, leaving you with dry chicken. A longer rest (up to 15 minutes for larger pieces) will yield even juicier results. You can lightly tent it with foil if you're worried about it getting cold, but avoid tightly wrapping it, which can steam the crust you worked so hard to create.
By consistently applying these principles—avoiding overcrowding, using a thermometer, and allowing for a proper rest—you will consistently achieve that perfect juicy result every time you cook chicken breast in a pan.
Troubleshooting Common Pan-Seared Chicken Problems
Even with the best intentions, cooking can sometimes present challenges. When learning how to cook chicken breast in a pan, you might encounter a few common issues. Here’s how to identify and fix them, ensuring your next attempt is a resounding success:
- Problem: Dry, Rubbery Chicken
- Cause: This is almost always due to overcooking. Chicken breast is very lean and cooks quickly. If you cook it past 165°F (74°C), the muscle fibers tighten up, squeezing out moisture and resulting in a tough, dry texture. Another cause can be not letting the chicken come to room temperature before cooking, or not allowing it to rest after cooking.
- Solution: Invest in an instant-read meat thermometer and pull the chicken off the heat as soon as it hits 165°F. Always let the chicken rest for 5-10 minutes after cooking. Ensure your chicken is pounded to an even thickness so it cooks uniformly and quickly.
- Problem: Unevenly Cooked Chicken (e.g., burnt on outside, raw inside)
- Cause: This typically happens if your chicken wasn't pounded to an even thickness, or if your pan wasn't consistently hot enough across its surface. It can also occur if you're using a pan that heats unevenly.
- Solution: Always pound your chicken breasts to an even thickness (around ¾ inch). Use a heavy-bottomed pan like cast iron or stainless steel that distributes heat well. Ensure the pan is preheated properly before adding the chicken, and don't overcrowd it, as this drops the pan's temperature.
- Problem: No Crispy Crust
- Cause: Lack of a crispy crust usually stems from too much moisture on the chicken, a pan that isn't hot enough, or overcrowding the pan. If the chicken steams instead of sears, you won't get that golden-brown exterior.
- Solution: Pat your chicken breasts thoroughly dry with paper towels before seasoning. Ensure your pan is screaming hot before adding the chicken. Cook in batches if necessary to avoid overcrowding, allowing each piece direct contact with the hot surface. Avoid covering the skillet when searing, as this traps steam.
- Problem: Chicken Sticks to the Pan
- Cause: This can happen if the pan isn't hot enough, or if you're trying to flip the chicken too soon before a crust has formed.
- Solution: Make sure your pan is sufficiently preheated. Add enough oil to lightly coat the bottom. When you place the chicken in, resist the urge to move it. A proper crust will naturally release from the pan when it's ready to be flipped. If it's sticking, give it another minute or two.
By understanding these common pitfalls and their solutions, you'll be well-equipped to consistently cook tender, juicy, and flavorful boneless chicken breast in a pan, making every meal a success.
Flavor Variations and Serving Suggestions
Once you've mastered the basic technique of how to cook chicken breast in a pan, the culinary possibilities are endless. The beauty of this versatile protein is how easily it adapts to a myriad of flavors and cuisines. Here are some ideas to inspire your next meal:
Flavor Variations:
- Herby & Garlicky: Before searing, rub the chicken with a mix of dried herbs like thyme, rosemary, and oregano, along with plenty of garlic powder. Finish with fresh parsley.
- Spicy Cajun: Use a generous amount of Cajun seasoning or a blend of paprika, cayenne pepper, onion powder, and garlic powder for a kick.
- Lemon-Herb: Add lemon zest to your seasoning mix, and a squeeze of fresh lemon juice over the chicken after it rests.
- Parmesan Crusted Chicken: Before searing, dredge your pounded chicken breasts in a mixture of flour, grated Parmesan cheese, garlic powder, and Italian seasoning. This creates an incredible crispy, cheesy crust.
- Asian Inspired: Marinate the chicken briefly in soy sauce, ginger, garlic, and a touch of sesame oil. Sear and then drizzle with a light teriyaki or sweet chili sauce.
- Mediterranean Twist: Season with dried oregano, basil, and a pinch of red pepper flakes. Serve with a dollop of tzatziki or a fresh tomato and cucumber salad.
Serving Suggestions:
Pan-seared chicken breast is a fantastic centerpiece that pairs well with almost anything. Its quick cooking time makes it ideal for building a complete meal in minutes.
- Classic Comfort: Serve sliced chicken breast alongside creamy mashed potatoes and steamed green beans or asparagus.
- Light & Fresh: Slice the chicken and add it to a vibrant mixed green salad with your favorite vinaigrette.
- Quick Pasta Dish: Cut the chicken into strips and toss with pasta, a light tomato sauce, and fresh basil.
- Healthy Bowl: Create a power bowl with quinoa or brown rice, roasted vegetables, and a drizzle of a homemade dressing.
- Sandwiches & Wraps: Cool the cooked chicken, slice it thin, and use it for delicious chicken sandwiches or wraps with your favorite fillings.
- Meal Prep: Cook a larger batch of chicken breasts at the beginning of the week. Store them in an airtight container in the refrigerator for up to 3-4 days. They can be easily reheated or used cold in salads, sandwiches, or quick stir-fries. This method is truly perfect for meal prep!
Experiment with different spices, marinades, and sides to keep your meals exciting. The versatility of pan-seared chicken breast means you’ll never get bored!
Frequently Asked Questions About Pan-Seared Chicken Breast
As you embark on your journey to master how to cook chicken breast in a pan, you might have a few lingering questions. Here, we address some of the most common inquiries to ensure you're fully confident in your cooking endeavors.
How long to cook chicken breast in a pan on a stove?
The cooking time for chicken breast in a pan on the stove will primarily depend on the thickness of your chicken. For a pounded chicken breast (around ¾ inch thick), you're typically looking at 5-7 minutes per side over medium-high heat. Thinner breasts (½ inch) might cook in as little as 3-4 minutes per side, while thicker, unpounded breasts could take 8-10 minutes or more per side. The most accurate way to tell if it's done is to use an instant-read meat thermometer; it should reach 165°F (74°C).
Is it better to bake or cook chicken breast in a pan?
Both methods work great, and it really depends on your desired outcome and preference.
- Pan-searing: Excellent for achieving a crispy, golden-brown crust and a juicy interior quickly. It's ideal for quick weeknight meals and when you want that delicious seared texture. It involves more active cooking time at the stove.
- Baking: Often preferred for hands-off cooking, especially when cooking larger quantities. It results in a more uniformly cooked, tender chicken, but typically without the crispy exterior unless you finish it under a broiler. Baking usually takes longer (20-30 minutes, depending on thickness).
If you're aiming for a beautiful sear and quick results, pan-searing is the winner. If you prefer a more hands-off approach or are cooking for a crowd, baking might be better.
Can I use frozen chicken breast for skillet cooking?
It is strongly recommended to thaw frozen chicken breast before cooking it on a skillet. Trying to cook still frozen chicken in a pan will result in uneven cooking – the outside will burn or dry out before the inside is cooked through. Thawing ensures even cooking and allows for better seasoning absorption, leading to a much more delicious and safer result. The best way to thaw is in the refrigerator overnight, or in a cold water bath (changing the water every 30 minutes) for a quicker method.
What kind of pan is best for cooking chicken breast?
- Dakota Johnson Nude
- Ifsa Sotwe Turk The Ultimate Guide To Understanding And Mastering The Art
- Sophie Rain
- Trendgasmoverdrive9clothoff Io
- Rik Estrada Larry Wilcox