Your First Minecraft Home: Building The Ultimate Starter House
Embarking on a new adventure in Minecraft is always exhilarating. You spawn into a vast, blocky world, full of endless possibilities and hidden dangers. Before you can conquer the Ender Dragon or build a sprawling empire, there's one crucial first step: establishing a safe haven. This is where the concept of a Minecraft starter house comes into play – your very first sanctuary against the night, a place to store your precious resources, and a foundation for all your future endeavors.
Whether you're a seasoned veteran starting a new survival world or a complete newcomer taking your first steps, building a functional and cozy starter house is paramount. It’s more than just four walls and a roof; it’s about creating a secure space that supports your early game progression. From gathering essential materials to laying down your first bed, this comprehensive guide will walk you through everything you need to know to construct the perfect Minecraft starter house, ensuring your initial days in the game are safe, productive, and enjoyable.
Table of Contents
- What is a Minecraft Starter House?
- Why Your First Shelter Matters
- Finding Inspiration: Designs and Blueprints
- Essential Materials for Your First Build
- How to Build a Starter Minecraft House Step-by-Step
- Adding Details and Functionality
- Expanding Your Starter House
- Survival Ready: Beyond the Starter House
What is a Minecraft Starter House?
At its core, a Minecraft starter house is your initial base of operations in a new survival world. It's designed to provide immediate safety and functionality, allowing you to survive the first few nights and begin gathering resources more efficiently. Unlike a grand, late-game base, a starter house is typically modest in size, built with easily accessible materials, and focuses on meeting your immediate needs.
- Burger King Plane Guy
- 4 Girls One Fingerprint Unraveling The Mystery Behind The Viral Trend
- Christin Black
- Carly Jane Onlyfans
- Did Jep And Jessica Get Divorced The Untold Story Behind Their Relationship Html
As the "Data Kalimat" suggests, a starter house is not meant to be a fully equipped base, filled with everything possible, but rather a basic house to help you get started. This is something I typically do when starting a new survival mode game. It's the first step in establishing your presence in the world, giving you the precious sense of safety for yourself and your belongings, and that is all you need in Minecraft to begin with.
Basic Needs for Survival
When you first spawn into a Minecraft world, your immediate priorities are to avoid hostile mobs and secure a place to respawn. This dictates the absolute minimum requirements for any Minecraft starter house. As the "Data Kalimat" highlights, these houses contain a crafting table, a furnace, and a bed to start you off. These three items are non-negotiable for early survival:
- Crafting Table: Essential for crafting almost all tools, weapons, armor, and blocks in the game. You'll need it to turn logs into planks, planks into sticks, and sticks into pickaxes.
- Furnace: Crucial for smelting ores into ingots, cooking raw food to restore more hunger, and turning sand into glass. Without a furnace, progression beyond basic stone tools is severely limited.
- Bed: The most vital item for survival. A bed allows you to skip the night, avoiding dangerous mobs like zombies, skeletons, creepers, and spiders. More importantly, sleeping in a bed sets your spawn point, meaning if you die, you'll reappear safely inside your house instead of at the world spawn. This prevents frustrating long treks back to your base to retrieve lost items.
Beyond these, a simple door and some light sources (torches) are critical for keeping mobs out and illuminating the interior, preventing hostile spawns inside your safe zone. The materials are very easy to gather, making these initial steps achievable within the first in-game day.
Beyond the Basics: Early Game Essentials
While the crafting table, furnace, and bed form the core, a truly functional Minecraft starter house often incorporates a few more elements to support early-game progression. As the "Data Kalimat" states, honestly, a starter house needs many parts beyond the absolute minimum. These additions significantly boost your efficiency and resource gathering:
- Small Farm: You must have a small farm to grow crops. This provides a renewable food source, reducing the need to constantly hunt animals or gather wild plants. Wheat for bread, carrots, potatoes, or beetroot are common choices.
- Cobblestone Generator: A cobblestone generator gives you a steady supply of building blocks. This simple contraption, using lava and water, can provide infinite cobblestone, which is invaluable for building, crafting stone tools, and even fueling your furnace.
- Mob Farm (Basic): While a complex mob farm might be a later-game project, even a basic dark room with a water stream can help you gather rare items like gunpowder from creepers, bones from skeletons, or string from spiders. This can be a simple pit or a small enclosed area near your base.
- Storage (Chests): Absolutely critical. As you gather resources, you'll quickly fill your inventory. Chests provide much-needed storage space, keeping your valuable items safe and organized.
- Interior Divisions: Inside the house, you might need a living room, a kitchen, and a dining room. While not strictly necessary for survival, these additions enhance the "cozy" factor and provide dedicated spaces for different activities, making your house feel more like a home.
- Brewing Room: A brewing room lets you make potions. While perhaps not a "day one" priority, setting aside space for a brewing stand and cauldrons early on can streamline your potion-making process once you acquire the necessary ingredients.
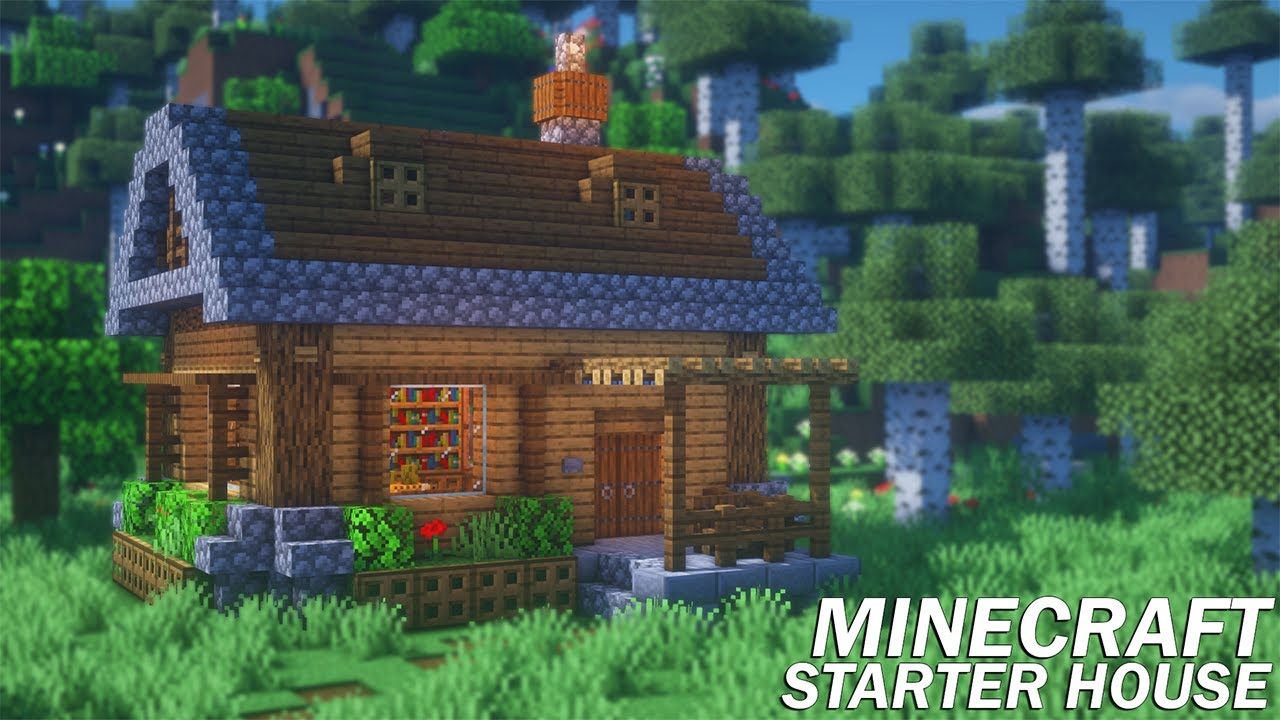
The compact yet beautifully detailed starter house is designed for beginners and pros alike, emphasizing that even a small build can pack a lot of functionality and comfort.
Why Your First Shelter Matters
The importance of a Minecraft starter house cannot be overstated. It's more than just a place to hide; it's the anchor of your entire survival experience. As the "Data Kalimat" aptly puts it, you will get the precious sense of safety for yourself and your belongings, and that is all you need in Minecraft. This sense of security is foundational for several reasons:
- Protection from Mobs: The most immediate benefit. When night falls, hostile creatures spawn. A secure house with proper lighting keeps them out, allowing you to work, craft, or simply wait out the night in peace.
- Safe Storage: Your inventory space is limited. A house provides a safe, accessible location for chests to store all your collected blocks, tools, food, and valuable ores. Losing valuable items due to death in the wilderness can be incredibly frustrating.
- Respawn Point: Setting your spawn point with a bed is crucial. Dying far from your base means a long, potentially dangerous journey back to retrieve your dropped items. A house ensures you respawn exactly where you need to be.
- Resource Hub: Your starter house quickly becomes a central hub for all your early-game activities. It's where you return to smelt ores, cook food, craft new tools, and plan your next mining expedition or exploration trip.
- Foundation for Expansion: A well-designed starter house can easily be expanded upon. The steps to building the best starter house that is perfect for expansion ensures that your initial efforts aren't wasted and can evolve into a larger, more complex base as your needs grow.
- Sense of Accomplishment: Building your first functional structure provides a significant sense of achievement and ownership in the vast Minecraft world. It transforms a wild landscape into a place you can call home.
This house is not meant to be a fully equipped base, but rather a basic house to help you get started, providing that essential sense of safety and a launchpad for your journey to beating the Ender Dragon.
Finding Inspiration: Designs and Blueprints
Once you understand the fundamental purpose of a Minecraft starter house, the fun part begins: choosing a design! The beauty of Minecraft lies in its creative freedom. You don't have to be an architectural genius to build something functional and appealing. As the "Data Kalimat" suggests, you can find inspiration for your first Minecraft house with these 27 designs, from simple wooden cabins to academic mansions. While an academic mansion might be a bit ambitious for a starter house, the principle of diverse inspiration holds true.
There are various designs and blueprints for starter houses in Minecraft, from small and simple to large and complex. You can browse different styles, materials, and block counts for your next building project. The key is to find something that resonates with your personal style while remaining practical for early-game survival.
Simple, Functional, and Expandable Designs
For many players, especially beginners, starting with a simple and functional design is the best approach. These designs prioritize utility and ease of construction, often using readily available materials. As the "Data Kalimat" mentions, this small starter house comes with everything you need for your survival world or server. The materials are very easy to gather, and the house comes packed with details. We've also included a detailed interior, but feel free to customize yours as you please!
- The Classic Box House: Don't underestimate the humble box. A simple 5x5 or 7x7 square provides ample space for your essential crafting table, furnace, bed, and a few chests. It's quick to build and offers maximum protection. You can always add details later.
- Small Wooden Cabin: A slight step up from the box, a wooden cabin often incorporates a simple peaked roof and perhaps a small porch. It's easy to build and gives you all the comforts a house from centuries ago would give you.
- Compact Hillside Dugout: Utilizing natural terrain can save resources. Digging into the side of a hill or mountain provides instant walls and a roof. You just need to excavate the interior, add a door, and light it up.
- The "Dio Rods" Inspired House: Today's guide is inspired by Dio Rods on YouTube, suggesting that many simple, aesthetic, and functional survival house designs can be learned from online tutorials. These often focus on using materials found on your first day of playing.
Remember, the design of the house should be focused on getting you started. It doesn't need to be your forever home, but a solid stepping stone.
Aesthetic and Biome-Specific Ideas
Once you've mastered the basics, or if you prefer a bit more flair from the start, consider aesthetic elements and designs tailored to specific biomes. As the "Data Kalimat" indicates, you can find out how to build a cozy and functional starter house in Minecraft for different biomes and themes, with tutorials, pictures, and tips for each house design. I'm trying to make a starter house for each biome 🏠 hope you like them!
- Cottagecore Home: Learn how to use stone, wood, and greenery to create your own cottagecore home with tutorials and tips. This style emphasizes natural materials, cozy interiors, and integration with the surrounding environment, often featuring gardens and rustic details.
- Super Cozy Minecraft 1.18 Starter House: This design, perfect for a location with amazing views, recommends building big windows facing west, so you can sleep on the couch and see an amazing sunset every time. This highlights how even a starter house can incorporate thoughtful design elements for a better player experience.
- Desert Oasis House: If you spawn in a desert, consider using sandstone and terracotta. A flat roof and interior courtyards can help keep the "heat" out.
- Snowy Cabin: For colder biomes, a sturdy wooden cabin with a stone foundation and a steep roof to shed snow would be fitting. Incorporate fireplaces for warmth and ambiance.
- Jungle Treehouse: For the adventurous, a small treehouse in a jungle biome offers natural elevation and protection.
The key is to let the environment inspire your build, using local materials to create a house that feels naturally integrated into its surroundings. See how it is made! Check out the gallery for photos!
Essential Materials for Your First Build
The beauty of a Minecraft starter house lies in its reliance on easily obtainable materials. You won't need diamonds or netherite for your first home. As the "Data Kalimat" states, this starter house uses materials found on your first day of playing. Here’s a breakdown of the most common and accessible materials:
- Wood (Logs and Planks): By far the most common and versatile early-game material. You can punch down trees to get logs, then convert logs into planks. Planks are used for walls, floors, ceilings, doors, crafting tables, and chests. Different wood types (oak, birch, spruce, jungle, acacia, dark oak, mangrove, cherry) offer varied aesthetics.
- Cobblestone/Stone: Obtained by mining stone with a pickaxe. Cobblestone is blast-resistant and fireproof, making it excellent for foundations, walls, or even an entire house. Smelting cobblestone in a furnace yields smooth stone, which has a cleaner look.
- Dirt/Gravel: While not ideal for permanent structures due to their low blast resistance and ease of destruction, dirt and gravel can be used as temporary walls or fill blocks in a pinch, especially for underground shelters.
- Glass: Made by smelting sand in a furnace. Glass is crucial for windows, allowing light in and providing views without compromising security. The "Super cozy Minecraft 1.18 starter house" specifically recommends building big windows facing west for amazing sunsets.
- Torches: Crafted from coal (or charcoal) and sticks. Torches are essential for lighting up your house, preventing hostile mob spawns inside, and illuminating your surroundings at night.
- Doors: Crafted from planks, doors provide a secure entry and exit point. Ensure they are properly sealed to prevent mobs from entering.
While the video features a mostly wooden build, following the tutorial with your block of choice is a simple matter. This flexibility means you can adapt designs to the materials most abundant in your starting biome.
How to Build a Starter Minecraft House Step-by-Step
Building your first Minecraft starter house doesn't have to be complicated. The steps to building the best starter house that is perfect for expansion are straightforward. Today's guide is inspired by Dio Rods on YouTube, emphasizing that visual tutorials can be incredibly helpful. Here’s a general step-by-step process:
- Gather Basic Resources (Day 1 Focus):
- Punch down several trees for logs (at least 20-30 logs for a small house).
- Convert logs into planks.
- Craft a crafting table.
- Craft wooden tools (pickaxe, axe, shovel).
- Mine some stone for a furnace and potentially stone tools.
- Find coal or make charcoal (by smelting logs) for torches.
- Choose Your Location:
- Look for a relatively flat area, or a hillside to dig into.
- Consider proximity to trees, water, and exposed stone for easy resource gathering.
- If you want those amazing sunset views, pick a spot with an open western horizon.
- Lay the Foundation (Optional but Recommended):
- Clear a 5x5 or 7x7 area.
- Place a layer of cobblestone or wood planks for the floor. This provides a clear boundary and prevents mobs from spawning directly under your feet if you're building on grass.
- Build the Walls:
- Stack your chosen wall material (planks, cobblestone) 3-4 blocks high.
- Leave a 1-block wide gap for a door and 1-2 block wide gaps for windows.
- Add a Roof:
- For simplicity, a flat roof of planks or cobblestone is quickest.
- For a more aesthetic look, use stairs and slabs to create a peaked roof.
- Install Door and Windows:
- Place your door in the designated gap.
- Fill window gaps with glass panes or blocks.
- Light it Up:
- Place torches generously inside your house (every 4-5 blocks) to ensure a light level of 8 or higher, preventing hostile mob spawns.
- Place torches outside around your house to deter mobs from gathering near your entrance.
- Place Essentials:
- Put down your bed, crafting table, and furnace.
- Craft and place a few chests for storage.
And just like that, you have a functional Minecraft starter house! Go check out the blueprint for this one and try it yourself.
Adding Details and Functionality
Once the basic structure of your Minecraft starter house is complete, you can begin to add details that enhance both its functionality and aesthetic appeal. This is where your personal touch truly shines. As the "Data Kalimat" notes, we've also included a detailed interior, but feel free to customize yours as you please!
- Interior Layout: Think about how you'll use the space. While a starter house is compact, you can still designate areas. Inside the house, you need a living room, a kitchen, and a dining room. Even if these are just small corners, they add to the feeling of a proper home.
- Lighting Variations: Beyond torches, consider other light sources as you progress. Lanterns, glowstone, sea lanterns, or even redstone lamps can provide more sophisticated lighting and ambiance.
- Furniture and Decor:
- Chairs and Tables: Use stairs, slabs, and fences to create simple furniture.
- Bookshelves: For enchanting later, but also for decoration.
- Flower Pots and Flowers: Add a touch of nature and color.
- Paintings and Item Frames: Personalize your walls.
- Carpets: Add warmth and texture to your floors.
- Windows with a View: As mentioned, the "Super cozy Minecraft 1.18 starter house" highlights the importance of strategically placed windows. It is perfect for a location with amazing views. I recommend building the big windows facing west, so you can sleep on the couch and see an amazing sunset every time. This simple detail can significantly improve your daily game experience.
- Exterior Landscaping: Don't forget the outside! Plant trees, create a small garden, add pathways, or even a small pond. This integrates your house into the landscape and makes it feel more welcoming. Learn how to use stone, wood, and greenery to create your own cottagecore home with tutorials and tips.
- Storage Solutions: Beyond basic chests, consider double chests, barrels (which can be placed in smaller spaces), or even a basic item sorting system if you're feeling ambitious.
The goal is to make your house not just a shelter, but a place you genuinely enjoy returning to after a long day of mining or exploring. Thanks for checking it out! Be sure to check out the YouTube tutorial on how to build it yourself!
Expanding Your Starter House
A well-designed Minecraft starter house isn't just a temporary hideout; it's a launchpad for your larger base. The beauty of Minecraft's block-based system is the ease of expansion. The "Data Kalimat" states that this house is not meant to be a fully equipped base, filled with everything possible, but rather a basic house to help you get started. However, it also notes that the steps to building the best starter house are perfect for expansion.
As your needs grow, you'll find yourself requiring more space for various activities. Here are some common ways to expand your initial home:
- Adding New Rooms:
- Dedicated Storage Room: As your resource collection grows, a larger room dedicated solely to chests and organization becomes essential.
- Enchanting Room: Once you find diamonds and obsidian, an enchanting room with bookshelves will be a priority.
- Brewing Room: If you didn't include one initially, a dedicated space for brewing stands and cauldrons will be necessary for potion making.
- Farm Expansion: Move your small farm outdoors or create a larger, more automated farm nearby. You might also add animal pens for sustainable meat, wool, and leather.
- Vertical Expansion: Add a second floor or even a basement. Basements are excellent for mining entrances, secure storage, or even a compact mob farm. Second floors can be used for bedrooms, enchanting rooms, or observation decks.
- Annexes and Outbuildings: Instead of making your main house larger, you can build separate structures connected by pathways. This could include a barn, a blacksmith's forge, a wizard tower, or a villager trading hall.
- Underground Extensions: Many players prefer to build extensive bases underground, connecting them to their starter house. This offers excellent security and allows for massive, hidden complexes.
The key is to think modularly. Design your starter house in a way that allows you to easily add sections without tearing down the original structure. This compact yet beautifully detailed starter house is designed for beginners and pros alike, emphasizing its adaptability.
Survival Ready: Beyond the Starter House
Your Minecraft starter house is the first crucial step on a much larger journey. It provides the initial safety and resources you need to thrive, but the world of Minecraft offers so much more to explore and conquer. As the "Data Kalimat" suggests, there are small survival houses here where you can start your journey to beating the Ender Dragon. You can choose which house you want to start in, but the ultimate goal is often to overcome the game's challenges.
Once your starter house is established and you're comfortable, you can begin to venture further and prepare for the game's end-game content:
- Advanced Mining: With a secure base, you can embark on longer mining trips, seeking out diamonds, redstone, lapis lazuli, and emeralds.
- Exploration: Discover new biomes, villages, temples, and strongholds. Your starter house serves as a safe return point after long expeditions.
- Enchanting and Potions: Utilize your enchanting and brewing rooms to create powerful tools, armor, and potions that will aid you in combat and exploration.
- Nether Exploration: Build a nether portal near your house and venture into the Nether for unique resources like quartz, glowstone, and netherite scraps.
- The End Dimension: Ultimately, your journey will lead you to the End, where you will face the Ender Dragon. Your starter house, having provided the foundation, will have enabled you to gather the necessary gear and prepare for this ultimate battle.
Learn how to build a simple, aesthetic, and functional survival house in Minecraft, and let it be the cornerstone of your epic adventures. This is the page where all your Minecraft objects, builds, blueprints and objects come together, providing a comprehensive resource for players at all stages of their journey. From a basic shelter to a sprawling base, every great Minecraft adventure begins with a humble Minecraft starter house.
<- Unraveling The Mystery Barron Trump Car Accident
- Mothers Warmth 3
- Carly Jane Onlyfans
- Is Steve Lookner Married
- Sophie Rain Only Fans Leak

Minecraft Small House Minecraft Starter House Minecra - vrogue.co
How To Build A Minecraft Starter House - Home Decor

Minecraft: How to Build a Medieval Starter House | Simple House
