Mastering Person Drawing: Your Ultimate Guide To Human Figures
Have you ever felt that compelling urge to capture the essence of a human being on paper, only to be met with frustration when your attempts fall short of your vision? Whether it's the dynamic movement of a dancer, the subtle expression on a face, or simply the correct proportions of a standing figure, the art of person drawing is both a fundamental skill and a continuous journey of discovery for artists of all levels. It's a craft that demands observation, patience, and a deep understanding of anatomy and form.
This comprehensive guide is designed to demystify the process of drawing people, offering you a clear, step-by-step pathway to developing your skills. From understanding the basic tools you'll need to mastering complex poses and expressions, we'll explore essential techniques that will transform your approach to the human figure. Prepare to unlock your potential and bring your characters to life on the page, whether your ambition is to create realistic portraits, dynamic manga characters, or expressive cartoons.
Table of Contents
- Two Babies One Fox
- Teach Me First Free Your Ultimate Guide To Unlocking Knowledge Without Breaking The Bank
- Raw Stopper Web 023kristi Noem Before
- Emily Compagno Husband
- Hollywood Secrets28mothers Warmth Chapter 3
- Why Learning Person Drawing is Essential for Every Artist
- Essential Tools for Your Person Drawing Journey
- Understanding Human Proportions: The Foundation of Drawing a Person
- Deconstructing the Human Form: Basic Anatomy for Artists
- Mastering Poses and Gestures in Person Drawing
- Adding Detail and Expression: Faces, Hands, and Feet
- Clothing, Environment, and Storytelling in Your Person Drawings
- Practice Makes Perfect: A Step-by-Step Approach to Drawing a Person
Why Learning Person Drawing is Essential for Every Artist
The human figure has captivated artists for millennia, serving as a timeless subject across cultures and art movements. Learning how to draw a person isn't just about replicating what you see; it's about understanding the complex interplay of anatomy, emotion, and movement. For aspiring and seasoned artists alike, mastering person drawing opens up a world of creative possibilities.
Firstly, it builds a foundational understanding of form and structure. The human body is incredibly intricate, with its bones, muscles, and soft tissues creating a dynamic and expressive form. By studying how to draw a human, you develop a keen eye for observation, learning to break down complex shapes into simpler components. This skill is transferable to drawing anything else, from animals to landscapes to inanimate objects. The principles of proportion, balance, and rhythm you learn when drawing people are universal in art.
Secondly, drawing people allows for unparalleled storytelling and emotional expression. A single pose, a subtle shift in facial features, or the gesture of a hand can convey a wealth of information about a character's mood, personality, or situation. Whether you're aiming to create a realistic portrait, a dramatic comic book panel, or a whimsical cartoon, the ability to convincingly render human figures is crucial for conveying narrative and connecting with your audience on an emotional level. As renowned art educator Andrew Loomis emphasized, understanding the human form is key to injecting life and credibility into your artwork. It's the ultimate challenge and reward for any artist.
- Nna Netrebko Net Worth
- 3tara Westover Husband
- Burger King Plane Guy
- Mothers Warmth Chapter 3 Jackerman
- Bocil Sotwe
Essential Tools for Your Person Drawing Journey
Before you embark on your quest to master person drawing, it's helpful to gather the right tools. You don't need an elaborate studio setup to begin; often, simplicity is key. The right materials can make a significant difference in your learning experience and the quality of your output.
At the most basic level, you'll need pencils and paper. For pencils, a range of hardness is ideal. Start with an HB pencil for general sketching, then add a 2B or 4B for darker lines and shading, and perhaps a 2H for very light construction lines that you might want to erase later. Mechanical pencils are also popular for their consistent line width. When it comes to paper, a smooth, medium-weight drawing paper (around 80-100 gsm) is excellent for practice. Don't be afraid to use a lot of paper; sketching is about exploration, not perfection.
Beyond the basics, a good kneaded eraser is indispensable. Unlike traditional rubber erasers, a kneaded eraser can be molded into various shapes to lift graphite without smudging or damaging the paper surface. A standard plastic eraser is also useful for more precise corrections. For blending and softening lines, a blending stump (also known as a tortillon) or even cotton swabs can be effective. Some artists also find charcoal pencils or conté crayons useful for creating expressive, gestural studies of the human figure, offering a different texture and tonal range. Finally, consider a sketchbook that you can carry with you. Inspiration for drawing a person can strike anywhere, and having a portable canvas means you can capture ideas on the go, practicing observation from real life.
Understanding Human Proportions: The Foundation of Drawing a Person
One of the most common hurdles in person drawing is achieving correct proportions. Without a solid grasp of how the human body is structured proportionally, your figures can end up looking distorted or unnatural. This foundational knowledge is crucial whether you're aiming to draw a man, a woman, a boy, or any human figure. It provides a blueprint upon which you can build your detailed drawings.
The Eight-Head Rule: A Classic Guide
A widely used guideline in art is the "Eight-Head Rule," which suggests that the average adult human figure is approximately eight heads tall. This rule provides a simple, scalable method for establishing vertical proportions. Here's a breakdown:
- Head 1: Top of the head to the chin.
- Head 2: Chin to the nipples/chest line.
- Head 3: Nipples/chest line to the navel.
- Head 4: Navel to the crotch. This marks the halfway point of the body.
- Head 5: Crotch to mid-thigh.
- Head 6: Mid-thigh to just below the knee.
- Head 7: Below the knee to mid-calf.
- Head 8: Mid-calf to the bottom of the feet.
While this is a general guideline and individual variations exist, especially in children (who are typically 5-6 heads tall) or idealized figures (often 8.5 or 9 heads for heroic proportions), it offers an excellent starting point for establishing the basic structure of a human body. Practice drawing a simple stick figure or mannequin using this rule to internalize these measurements.
Key Proportional Landmarks and Their Significance
Beyond the vertical head count, understanding key horizontal and internal proportional landmarks is vital for drawing people accurately. These landmarks act as anchors, helping you place features and limbs correctly:
- Shoulder Width: Typically, the width of the shoulders is about 2 to 2.5 head-widths.
- Elbows: When the arm hangs naturally, the elbow usually aligns with the navel.
- Wrists: The wrist generally aligns with the crotch area.
- Fingertips: The fingertips, when the arm is fully extended downwards, often reach about mid-thigh.
- Eyes: The eyes are roughly halfway down the length of the head.
- Nose: The bottom of the nose is about halfway between the eyes and the chin.
- Mouth: The mouth is roughly halfway between the bottom of the nose and the chin.
By consistently applying these proportional rules and landmarks, you'll find that your figures gain a sense of realism and believability. Don't be afraid to use a ruler or even your pencil as a measuring tool to compare lengths and widths as you learn. Over time, these measurements will become intuitive, allowing you to sketch more freely and confidently.
Deconstructing the Human Form: Basic Anatomy for Artists
While you don't need to be a medical doctor to excel at person drawing, a fundamental understanding of human anatomy is invaluable. Knowing the underlying bone structure and major muscle groups helps you understand why the body looks the way it does, how it moves, and where the major forms and contours lie. This knowledge transcends mere copying; it allows you to draw a human from imagination, in various poses, and with a sense of solidity.
Start by familiarizing yourself with the skeleton. The skull, rib cage, pelvis, and the long bones of the limbs (femur, tibia, fibula, humerus, radius, ulna) are the primary structural components. Think of them as the armature of your figure. Understanding their shapes and how they connect will prevent your figures from looking "boneless" or floppy. For instance, knowing the shape of the rib cage helps you correctly render the torso, and understanding the pelvic bone's tilt is crucial for dynamic poses.
Next, focus on the major muscle groups that define the surface forms. You don't need to memorize every single muscle, but knowing the deltoids (shoulders), pectorals (chest), biceps and triceps (arms), quadriceps and hamstrings (thighs), and gastrocnemius (calves) will give your figures volume and definition. Pay attention to how these muscles attach to bones and how they stretch and contract with movement. For example, when drawing a man with a powerful physique, understanding the bulk and definition of the major muscle groups is key to conveying strength. Resources like "Figure Drawing for All It's Worth" by Andrew Loomis or "Anatomy for Artists" by Sarah Simblet are excellent references for this kind of study. Regular practice drawing from anatomical diagrams and life models will solidify this knowledge, allowing you to intuitively build a believable human body from the inside out.
Mastering Poses and Gestures in Person Drawing
Once you have a grasp of proportions and basic anatomy, the next step in person drawing is to bring your figures to life through dynamic poses and expressive gestures. A static, stiff figure lacks vitality, whereas a figure imbued with a sense of movement and emotion immediately engages the viewer. This is where the art of observation truly comes into play.
The Power of the Line of Action
The "line of action" is perhaps the most critical concept for capturing dynamic poses. It's an imaginary line that flows through the main axis of the figure, conveying its overall movement and energy. Think of it as the spine of your drawing, dictating the rhythm and flow of the pose. Instead of starting with rigid shapes, begin your sketch by drawing a loose, curved line that represents the primary direction of the figure's movement. For example, a running figure might have a strong diagonal line of action, while a figure bending over might have a C-curve. This initial line helps you avoid stiff, symmetrical poses and encourages fluidity. It's the first step in how to draw a person that feels alive.
Dynamic vs. Static Poses: Bringing Figures to Life
Understanding the difference between dynamic and static poses is fundamental to effective drawing people. Static poses are often symmetrical and lack a clear sense of movement, like a person standing rigidly at attention. While useful for anatomical study, they don't tell a story. Dynamic poses, on the other hand, are characterized by asymmetry, contrapposto (a natural weight shift where the body's weight is on one leg, causing the hips and shoulders to tilt in opposite directions), and clear lines of action. They convey motion, emotion, and intention.
- Practice Gesture Drawing: This involves making quick, timed sketches (30 seconds to 2 minutes) to capture the essence of a pose rather than precise details. It trains your eye to see the overall flow and energy.
- Use Reference Photos: Look for photos of people in action – dancing, running, sitting casually, reaching. Pay attention to how the body twists, stretches, and compresses.
- Study Real Life: Observe people in everyday situations. How do they stand when waiting? How do they sit when talking? These subtle nuances add authenticity to your drawings.
By focusing on gesture and dynamic lines, you'll find that your figures, whether you're drawing a boy in mid-jump or a contemplative woman, will possess a natural vibrancy that captivates the viewer. Remember, the goal is not just to draw a body, but to draw a body that feels like it could move.
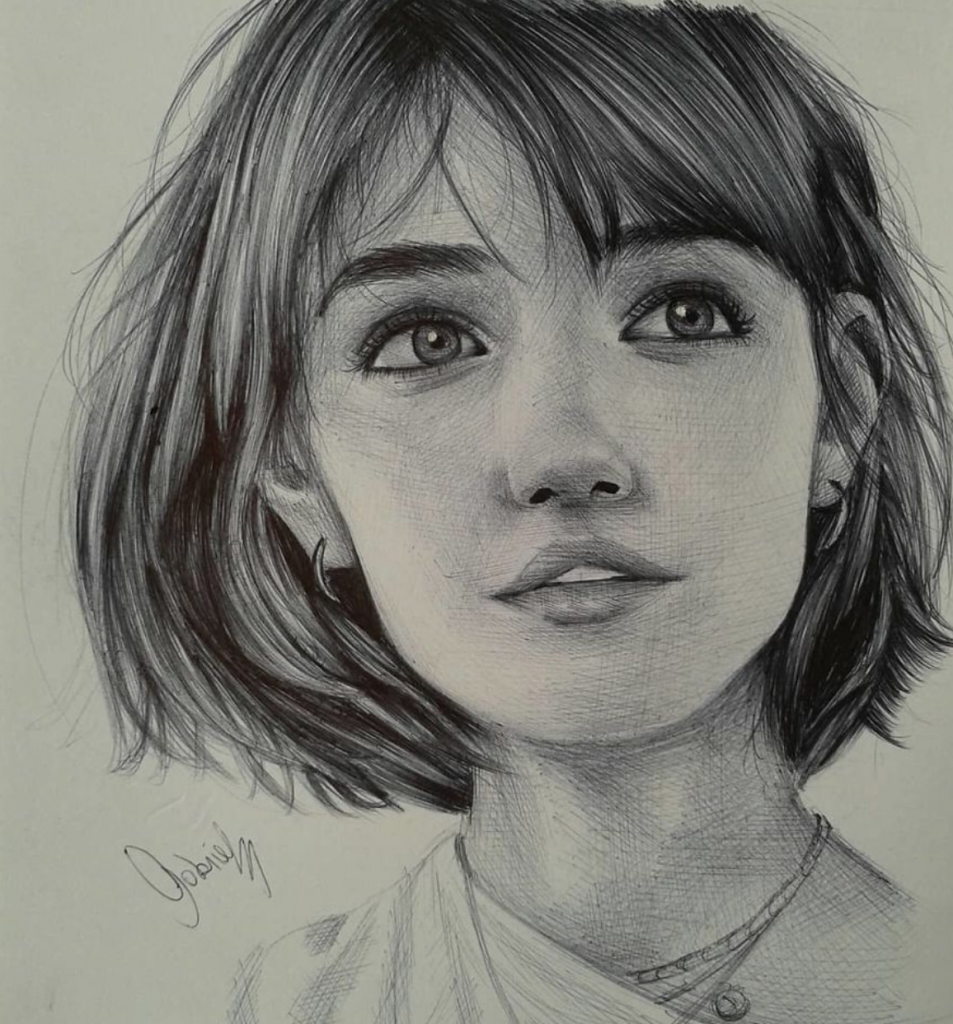
Adding Detail and Expression: Faces, Hands, and Feet
While the overall form and pose are crucial for person drawing, it's the intricate details of faces, hands, and feet that often bring a figure to life and convey personality. These are often considered the most challenging parts of the human anatomy to draw, but with focused practice, they can become your strengths.
Faces: The face is the window to the soul, capable of conveying a vast range of emotions. Beyond the proportional guidelines mentioned earlier, focus on the unique characteristics of each individual. Pay attention to the shape of the eyes, the curve of the eyebrows, the width of the nose, and the fullness of the lips. Understanding the underlying bone structure (skull, cheekbones, jaw) helps in placing these features correctly. Practice drawing various expressions – joy, sadness, anger, surprise – by observing how muscles around the eyes, mouth, and forehead contract and relax. Even subtle shifts can dramatically alter an expression.
Hands: Hands are incredibly complex and expressive. They can gesture, hold objects, or rest in a relaxed manner. Break them down into simpler shapes: the palm as a block, and the fingers as cylinders. Pay attention to the knuckles, the varying lengths of the fingers, and the thumb's unique mobility. Observe how hands interact with objects and how they convey emotion. A clenched fist, an open palm, or delicately intertwined fingers all tell a story. Many artists find drawing hands daunting, but consistent practice from life and photo references will yield significant improvement.
Feet: Often overlooked, feet are essential for grounding your figure and conveying balance. Like hands, they have a complex bone structure. Think of the foot as having three main masses: the heel, the arch, and the ball of the foot (where the toes begin). Pay attention to the ankle bones, the curve of the arch, and the individual toes. Observe how the foot flattens or flexes depending on the weight distribution and pose. Whether your figure is standing, walking, or running, accurately drawn feet contribute significantly to the overall believability and stability of your person drawing.
Dedicate specific practice sessions to these areas. Draw them from different angles and in various states of action or rest. The more you observe and sketch these intricate details, the more confident you'll become in rendering them effectively.
Clothing, Environment, and Storytelling in Your Person Drawings
Once you've mastered the fundamentals of drawing the human figure, the next step is to integrate your characters into a larger narrative by adding clothing and placing them within an environment. This transforms a mere anatomical study into a compelling piece of storytelling, making your person drawing truly come alive.
Dressing Your Characters: Understanding Fabric and Drapery
Clothing is not just an accessory; it's an extension of your character's personality, status, and the era they inhabit. When drawing clothes, remember that they drape over the underlying form of the body. Avoid drawing clothes as flat cutouts. Instead, first sketch the naked figure, then "dress" it, allowing the fabric to follow the contours of the body. Pay attention to:
- Folds and Wrinkles: These are created by tension, compression, and gravity. Observe how different fabrics (cotton, silk, denim) create distinct types of folds. Common fold types include pipe folds (cylindrical), zigzag folds (accordion-like), and spiral folds (around limbs).
- Weight and Thickness: A heavy coat will drape differently from a light scarf. Understand how gravity affects different materials.
- Movement: If your character is in motion, their clothes should reflect that movement, showing dynamic folds and billows.
By understanding how fabric behaves, you can add realism and depth to your figures, whether you're drawing a man in a tailored suit or a boy in casual wear.
Integrating Figures into Settings: Creating a World
A figure floating in white space can be powerful, but placing your person drawing within an environment adds context and narrative depth. The setting can reveal who the character is, what they're doing, and even their emotional state. Consider:
- Perspective: Ensure your figure is drawn in correct perspective relative to the environment. If the figure is standing on a floor, make sure their feet align with the perspective lines.
- Lighting: The light source in your environment should consistently illuminate your figure, creating shadows that anchor them to the ground and give them volume.
- Atmosphere: Use elements of the environment to enhance the mood. A dark, cluttered room might suggest mystery, while a bright, open landscape might convey freedom.
- Interaction: How does your character interact with their surroundings? Are they leaning against a wall, sitting on a bench, or walking through a bustling street? These interactions make the scene believable.
By thoughtfully integrating clothing and environment, you transform a simple drawing of a person into a rich, immersive story that resonates with your audience. It's about building a believable world around your characters.
Practice Makes Perfect: A Step-by-Step Approach to Drawing a Person
The journey of mastering person drawing is continuous, but consistent practice, guided by a structured approach, will yield significant progress. As the "Data Kalimat" suggests, learning how to draw a person can be broken down into simple, manageable steps. Here is an overview of a practical tutorial approach, designed to help you get the basics of drawing a person step by step, ensuring an easy-to-follow process:
- Start with Basic Shapes (The Mannequin): Don't jump straight into details. Begin by sketching the human figure as a series of simple geometric shapes – circles for joints (head, shoulders, elbows, knees), cylinders for limbs, and boxes for the torso and pelvis. This initial "mannequin" helps establish proportions and pose without getting bogged down in anatomy.
- Establish the Line of Action: As discussed, draw a single, flowing line that captures the overall energy and direction of your pose. This is your guiding principle for dynamic figures.
- Refine Proportions with the Eight-Head Rule: Once your basic shapes are in place, use the eight-head rule and key proportional landmarks to adjust and ensure your figure's dimensions are accurate. This is crucial for drawing a human that looks balanced.
- Block in Major Forms (Anatomy Lite): Lightly sketch in the major anatomical masses – the rib cage, pelvis, and the main muscle groups. Think of these as larger, simplified forms rather than individual muscles. This gives your figure volume.
- Sketch the Limbs and Connectors: Connect the main body masses with the limbs, paying attention to how they articulate at the joints. Ensure the flow of the limbs follows the line of action.
- Add Details to Hands and Feet: Once the overall form is solid, move to the intricacies of hands and feet. Use simple shapes first, then refine. Remember their expressive potential.
- Develop the Head and Facial Features: Focus on the skull shape, then place the eyes, nose, and mouth according to proportional guidelines. Begin to suggest expression.
- Consider Clothing and Drapery: If your figure is clothed, lightly sketch the underlying body, then draw the clothing over it, paying attention to how the fabric drapes and folds.
- Refine Lines and Add Contours: Go over your initial light sketches with more confident lines, defining the contours of the body and clothing. Use varying line weights to add interest.
- Introduce Shading and Form: Begin to add basic shading to give your figure three-dimensionality. Identify your light source and apply shadows to indicate form and depth. This transforms your flat drawing into a volumetric one.
- Integrate with the Environment (Optional but Recommended): If your figure is part of a scene, lightly sketch in key environmental elements, ensuring they align with the figure's perspective and lighting.
- Review and Correct: Step back from your drawing. Identify areas that look off – proportions, pose, or anatomy. Don't be afraid to erase and refine. This iterative process is how you improve.
- Practice Loose Sketches: Regularly engage in gesture drawing and quick studies. This builds muscle memory and helps you capture the essence of a pose quickly, a vital skill for drawing people effectively.
- Explore Different Styles: Whether you want to draw realistic, manga, or cartoon characters, the underlying principles of proportion, anatomy, and gesture remain. Experiment with different styles once you have a solid foundation.
- Seek Inspiration and Feedback: Look at the work of master artists, study life, and don't hesitate to ask for constructive criticism from peers or mentors. Learning how to draw a person is a journey, not a destination.
By following these basic guidelines and dedicating time to consistent practice, you will steadily build your confidence and skill in drawing the human figure, transforming your ability to draw a person from a challenge into a rewarding artistic endeavor.
Conclusion
The art of person drawing is a profound and endlessly rewarding pursuit. We've journeyed through the essential tools, demystified human proportions, touched upon the vital aspects of anatomy, and explored how to imbue your figures with dynamic poses and compelling expressions. From the initial line of action to the intricate details of faces and hands, and finally to integrating your characters into rich environments, each step builds upon the last, guiding you towards greater mastery.
Remember, the path to drawing a human figure convincingly is paved with consistent practice and keen observation. Don't be discouraged by initial challenges; every stroke is a learning opportunity. Embrace the process of loose sketches, study from
- Peter Ellis Kings Guard
- Did Jep And Jessica Get Divorced The Untold Story Behind Their Relationship Html
- Jessica Springsteen Married
- The Magic Of Star Session Set Your Ultimate Guide To Mastering The Art
- How Old Is Chino Alex

10 Tips for Drawing People for Beginners - Jae Johns

How To Draw A Person Easy Tutorial - Toons Mag
Mastering Drawings of People
